If at your home or your workplace, you have several systems or computers then, one thing that you need to control is, which users or apps get to change things in that system. If there is a single person, as an administrator, then, this will become very easy to prevent authorized changes. However, it’s not enough to have a single person managing everything. So, in this article, we’re gonna figure out the question – What is UAC in Windows 10, and How to Disable It?
What is UAC?
UAC is a security feature in Windows 10, while you go to install an application on your PC and click on that application to open and run with administrator privileges you get a popup, in this, you are asked whether you want to run the application on your PC or not. Eventually, to complete the installation process you click on the “Yes” button.

This popup is called UAC(User Account Control). Basically, a user account control: reminds you that whether you are installing the application is safe for your computer or not. In this way, this helps to boost your system security consequences. But sometimes this can bother you. But, hopefully, there are methods present to disable it from your Windows 10 PC.
More about User Account Control
UAC works as a guard to prevent non-certified changes or the installation of applications that can change the settings (Hyperlink) of your PC. You will get a popup of user account control when any changes are appearing in your system at the administrator level.
When it’s necessary to disable the UAC?
If you frequently open a certain program and you are getting a popup back to back, then it’ll become necessary to disable the UAC.
Note- If you want to disable the UAC from your Windows 10 computer, then, you can do it at your own risk.
Now, here we go to the methods to disable the user account control from your Windows 10 PC. Just follow the methods and steps to do this.
How to Disable UAC on Windows 10
In this article, we’ll teach you three methods to disable UAC from your Windows 10 PC.
- Disable User Account Control in Windows 10 through Security and Maintenance.
- Disable User Account Control in Windows 10 through the Prompt.
- Disable UAC on Windows 10 through the User Account.
Let’s start with the first method.
Disable User Account Control in Windows 10 through Security and Maintenance.
Please follow the following steps to disable UAC through security and maintenance.

Step 3. Now, from here, you have two options to open the User Account Control settings window.
- Go to the left side of the page, you will see the 4 links. Now, press the second positioned tap which is User Account Control Settings.
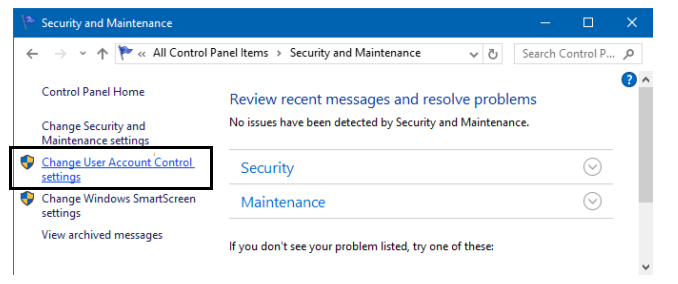
- Second, you can click on the arrow tip on the security option from the right side of the page to expand it.

By scrolling, find out the UAC in the lowermost area, and click on the “Change Settings” link.
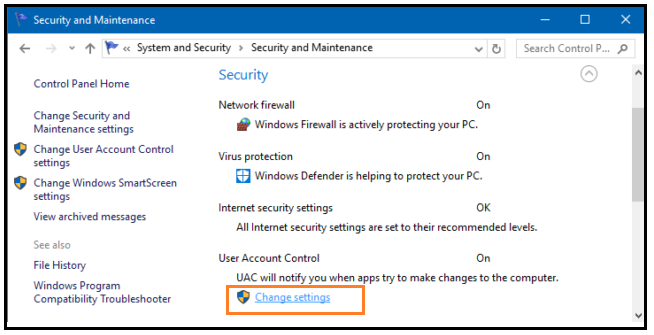
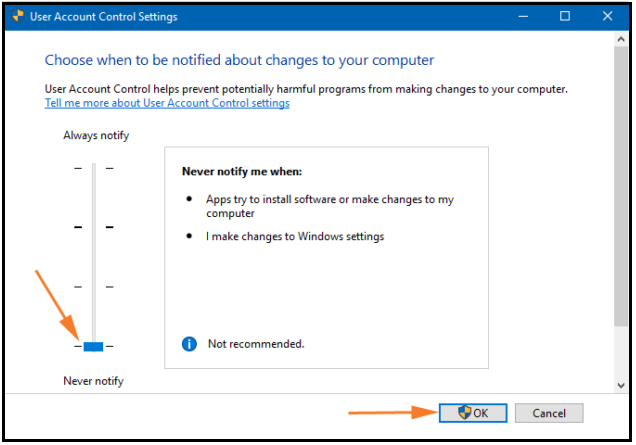
Step 4. Now, the UAC window will appear on the screen. Here, you’ll be able to see a slider indicating different positions and their respective responsibilities mentioned by their side. By default, the second position is selected (From the top).
Step 5. Drag the slider to the last position. Here, you will get the option- Never Notify. Click on it to successfully disable it. Now, Click on the Save button.
Step 6. If it asks for a password, then put your password to validate.
Step 7. Now, reboot your system, and your UAC will disabled now.
Disable User Account Control in Windows 10 through the Prompt.
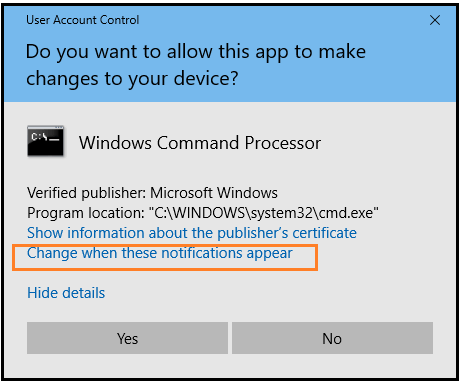
Step 1. By running or installing an application, launch a UAC popup.

Step 2. Now, click on the “Show More Details” link. After clicking on it a new link will appear- Change when these notifications appear, click on this link.
Step 3. A UAC settings window will appear now, Move the slider to the bottom, where it is written “Never notify” then press ‘OK’. That’s it.
Disable UAC (User Account Control) on Windows 10 through User Account.
You can also disable the User Account Control by this method. To disable your UAC by this method, please follow the below-mentioned steps.
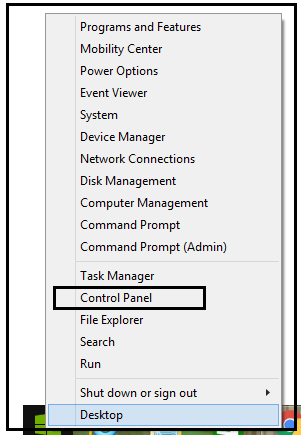
Step 1. Make a right-click on the Windows icon on your computer. A navigation bar is open, navigate “Control Panel” and hit on it.
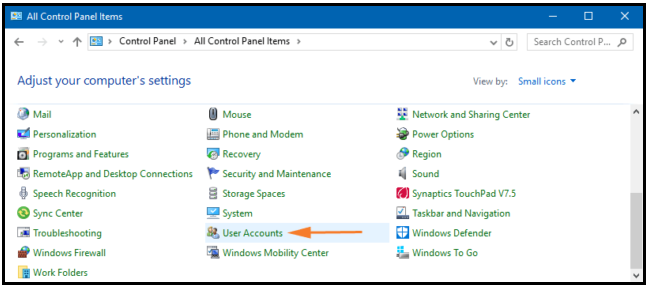
Step 2. Now, choose the User Account on the control panel window and click on it.
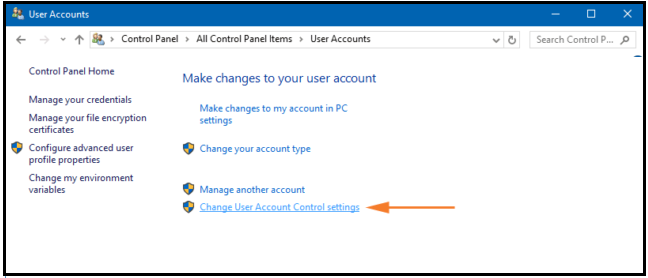
Step 3. Now, press the link named- “Change User Account Control settings”.
Step 4. Now, move your slider to the bottom where it is written “Never notify” then press ‘OK’. That’s it.
That’s it. Hope this will help you.