How to Disable Windows Mobility Center: Windows mobility center is a bundled tool to change or adjust the brightness, screen orientation, battery status, volume, Sync Center settings, presentation, and external display settings. It is a by default setting available on a Windows PC (Like Laptops and Tablets). This is not available on Desktop PC unless it is enabled or your Desktop has a UPS.
Why do you need to Disable the Mobility Center?
If you have enabled the Mobility center in your PC then it keeps popping up. Here it becomes necessary to disable it. And in this guide, we’ll discuss the methods by which you can disable the Mobility center from your Windows 10 PC.

Here are two methods which helps to you to Disable the Mobility Center
1: Disable Windows Mobility Center by using Group Policy.
2: You can Disable Windows Mobility Center by Using the Registry Editor.
Disable Windows Mobility Center by using Group Policy
To disable Mobility center by using Group Policy, you’ve to follow the following steps:
- First of all press the ‘Window+R’ button together to open the Run Dialog Box.
- A dialog box will open then simply type gpedit.msc and then press Enter or OK Button.

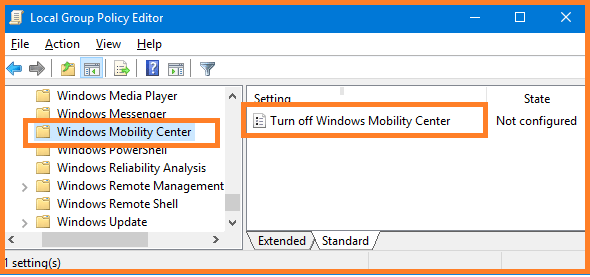
- Now, the Local Group Policy Editor will open. Now expand it: Computer Configuration > Administrative Templates > Windows Components > Windows Mobility Center. Next, double click on the urn off Windows Mobility Center.
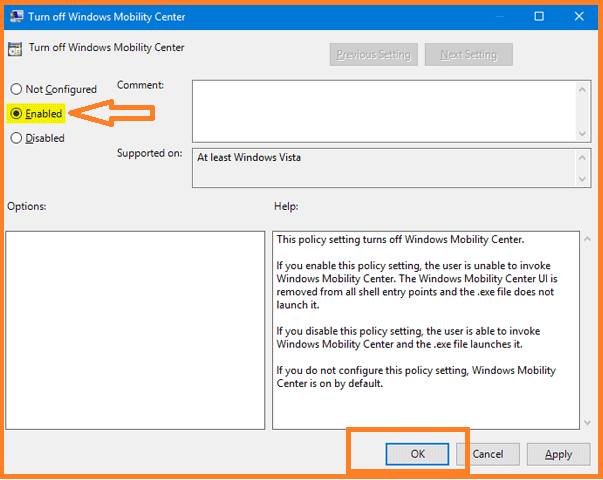
- Select the Enable option and then click on the Ok Button.
- Next, restart your computer.
Method 2: Using the Registry Editor.
To disable Mobility center by using the Registry Editor, you’ve to follow the following steps:
First of all press the ‘Window+R’ button together to open the Run Dialog Box.

Now, Simply type Regedit and then press the Enter button or OK button.
Now, navigate the following key:
HKEY_LOCAL_MACHINE\SOFTWARE\Microsoft\Windows
\CurrentVersion\Policies\MobilityCenter
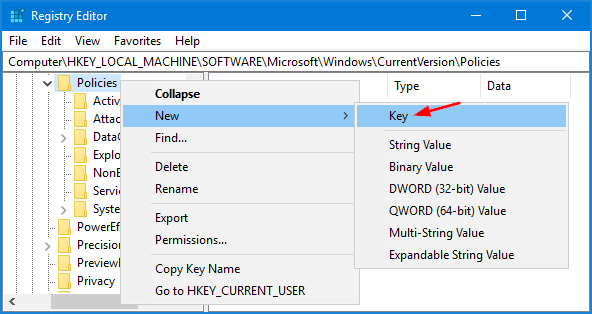
If the mobility Center key doesn’t exist then make a right-click on the Policies key then create a new Mobility Center Key. from here.
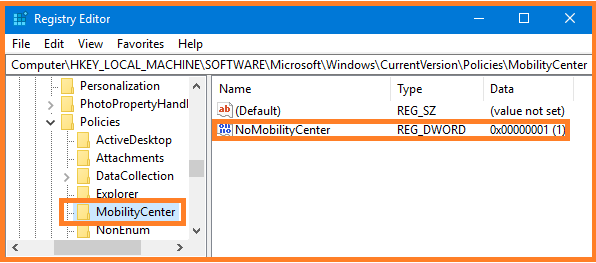
Now, right-click the blank area in the right-hand area to create a DWORD (32-bit Value) entry called NoMobilityCenter and give it a value of 1.
Close the Registry Editor window and then restart the computer. And the user can not use Windows Mobility Center anymore.
Note- If you want to re-enable the Windows Mobility Center then just change the Value data of NoMobilityCenter from 1 to 0.