If you want to know that- What is Cortana and how to enable Cortana in Windows 10, then first of all you should know What is Cortana in Windows 10. So let’s begin the journey.
Main Highlights of this article:
- What is Cortana in Windows 10?
- What is the use of Cortana?
- How to Enable Cortana in Windows 10?
- What is the purpose of Cortana?
What is Cortana in Windows 10?
Cortana is a digital assistant in Windows 10 that is always present to help you. She is always ready to help in finding anything or any answer to a question on your Windows 10 computer.

If you don’t want to miss any updates, forecasts, and important dates then Cortana is always ready to assist you. That’s why she becomes very important to everyone. And if you have already installed it or enabled it and are searching for the answer to the question of how to turn off Cortana in Windows 10? then you have to click on the link and learn how to turn off it. In this article, we are gonna discuss How to Enable Cortana in Windows 10. So stay tuned with us.
By default, Cortana is not enabled in the computer system with Windows 10 but don’t worry it doesn’t take much time to get her ready to run. Before enabling Cortana on your Windows 10 Pc you should know about the use of Cortana. So let’s talk about the use of this software on your PC.
What is the use of Cortana?
As we said that this is a virtual assistant which is developed by Microsoft and uses the Bing Search Engine to perform tasks like Reminders of settings and question answering for the users.
What is the purpose of Cortana?
This is a Voice-enabled virtual assistant and the main purpose of this is to save the precious time of users of Windows 10. With help of Cortana, users can initiate requests and complete tasks. So this is very useful software for users of Windows 10.
Now hope you all know about Cortana. So let’s start with the main topic of this article i.e-
How to Enable Cortana in Windows 10?
Follow these steps to set up Cortana on your Computer-
- Click on the start menu.
- Then click on All Apps.
3- Now you will able to see the Cortana Button.
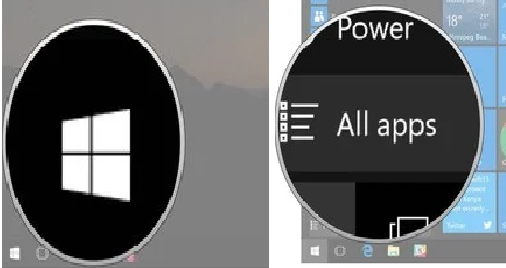
4- Click on the Cortana Button. The icon of Cortana is a Circle, you have to click on the circle Icon if the Cortana word does not appear on your screen.

5- After Clicking on Cortana Button you will be able to see Use Cortana Button.
6- Then Click Yes.
7- Now, Cortana is all set to assist you and ready to use also.

How to Pin Cortana to the taskbar on Windows 10 PC?
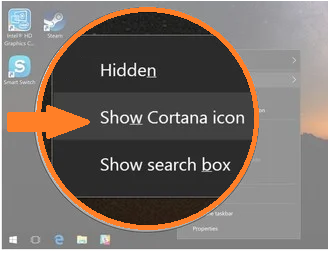
Now, if you want to add this software to your taskbar then you have to follow these steps. Cortana does not appear in the taskbar by default you have to add it to this.
1- Make a right click on the taskbar.
2- Click on Cortana Button.
3- Click on the Option “Show Cortana icon”.
How to turn on “ Cortana” on Windows 10 PC?
Now if you have enabled it and pinned also to the taskbar menu. Now you have one more challenge: How to turn on “Hey Cortana” on your Windows 10 PC. You don’t need to go anywhere. We will guide you here for doing this. Here are some steps given below using these steps you can simply turn on your “Hey Cortana.”
- Click “Windows+S” to open Cortana.
- Now a notebook Button will appear on your screen.
- Click on this Notebook Button.
- Then click on the setting Icon or Setting Button.
- Now click on the “ON/OFF” button in the Hey Cortana heading.
Now, you are able to know last night’s football score, the Weather report for today, and many more that you want to ask Cortana and want to know.
Hope! This article will help to resolve your Issue related to Enabling Cortana in your system
Final Words
You can say- Cortana is digital assistance and this helps you by saying some commands. Enabling or disabling it is very easy. All steps are mentioned above in the article.
Tell us, for which purpose do mainly you use Cortana?
Is it making your tasks easy or not?