Reinstall Mouse Driver in Windows 10: If you are facing a problem with your old Mouse driver then here is a solution to Uninstall it and Reinstall it. If you have windows 10 on your PC then Uninstall and Reinstall Mouse Drivers in Windows 10 will become very easy for you by reading this article. Sometimes, the installed driver starts having problems, then there is a quantity measure left and it is to uninstall the old driver and reinstall it. The same thing is with a mouse driver.
Also read- List of More than 180 Windows 10 useful keyboard shortcuts
If you are facing such a type of problem and want to know How to Uninstall and Reinstall Mouse Driver in Windows 10? Then take a look at this post and definitely, you will be able to resolve your problem related to your mouse driver. Because in some cases, the device software is not up to date and causes various messes.
Uninstall and Reinstall Mouse Driver in Windows 10?
Here is the process of How to Uninstall and Reinstall Mouse Driver in Windows 10. Just follow these simple steps-
Step 1– First of all, make a right-click at the bottom-left corner of the screen of your computer. Or you can press Windows+X Together.
Step 2– Now, select Device Manager.
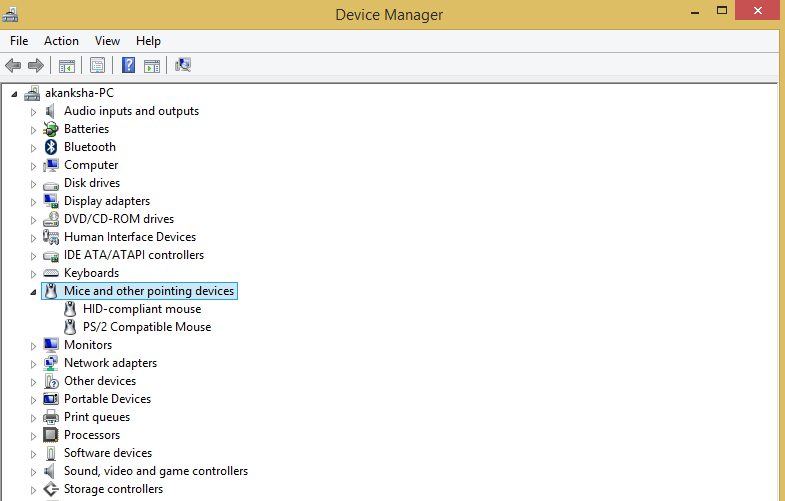
Step 3– It will become visible and now you can see all installed devices here. Now scroll down and find the Mice and other pointing devices option, among all installed devices. Make a click on this option and expand it.
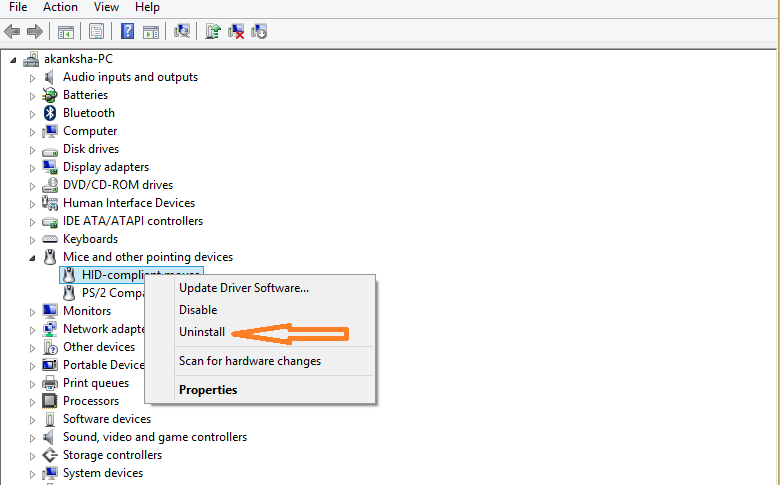
Step 4– Now, the Installed Mouse driver’s name will be visible to you. Make a right-click on this and select the Uninstall Device option.
Step 5– Now, a pop-up will appear and will ask you to confirm that you want to uninstall the driver.
Step 6– Ensure that the box next to “Delete the Driver Software for This Device” should not be checked. This will enable automatically reinstalling the driver on your system when you restart your PC.
Step 7– Now Click on the Uninstall button.
Other Method: In case the new driver causing problems
This method will help you If you are facing any problem after Re-Installing the mouse driver in your system. You can go with Roll Back to the previous option. Just follow these steps to do so –
- Open Device Manager using any of your preferred procedures.
- When you access the Device Manager console, locate and expand the category namely Mice and Other Pointing Devices.
- Make the right click on the mouse driver which you have installed previously.
- Now, select the Properties option and then click on it.
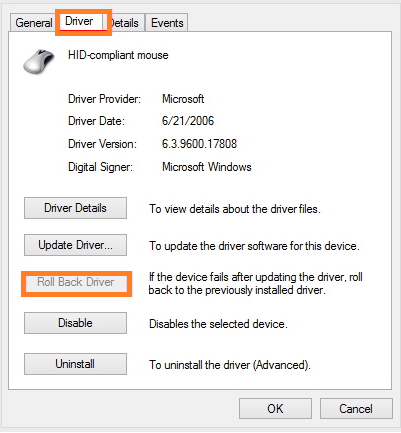
- Now, a properties section is open on your screen, Now Select the driver tab then click on the Roll Back Driver option and then click.
That’s all. Thanks.