
In the Task Manager on your Windows 11 or Windows 10 PC, you may have noticed several Google Chrome processes running at the same time. It might look unusual, especially when you have only one Chrome window open. You may even wonder whether Chrome is consuming too much RAM or whether something is wrong with your computer.
Google Chrome uses a multi-process architecture to keep tabs, extensions, and browser components running separately. However, if Chrome launches too many processes, consumes excessive memory, or continues running after you close it, investigating the issue makes sense.
The problem can sometimes be related to unnecessary extensions, background applications, corrupted browser data, or outdated software. Fortunately, you can try several troubleshooting methods without immediately reinstalling Chrome.
In this guide, you’ll learn how to fix multiple Google Chrome processes running in Windows 11/10.
Fix Multiple Google Chrome Processes Running in Windows 11/10
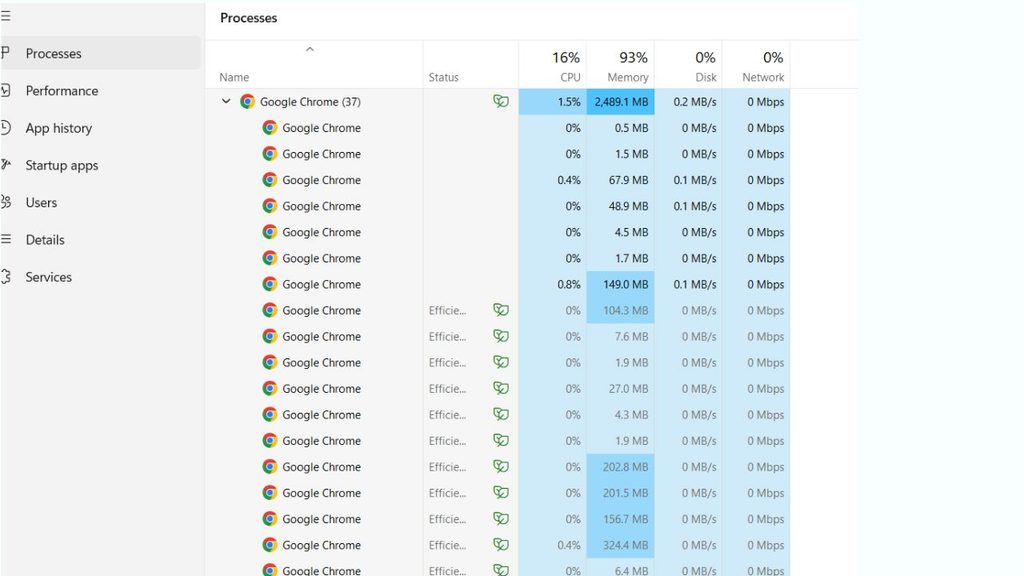
To troubleshoot excessive Google Chrome processes in Windows 11 or Windows 10, follow these steps:
- Restart Chrome and your computer.
- Check which Chrome components are using system resources.
- Disable unnecessary Chrome extensions.
- Turn off background applications when Chrome is closed.
- Update Google Chrome to the latest available version.
- Clear unnecessary browsing data.
- Reset Chrome settings if the problem continues.
- Scan your computer for unwanted software.
- Reinstall Chrome if other solutions do not work.
Remember that seeing multiple Chrome processes does not automatically indicate a problem. The goal is to resolve excessive resource usage or abnormal behavior, not eliminate every Chrome process.
Step 1: Restart Google Chrome and Your Computer
Start with a simple restart before changing any browser settings. Chrome processes can occasionally remain active because of a stuck tab, an unresponsive extension, or a background task that has not finished.
Open Chrome and save any important work in your tabs. Then click Settings and more (three dots) > Exit to close the browser completely.
Next, press Ctrl + Shift + Esc to open Task Manager. Select the Processes tab and look for Google Chrome entries. If Chrome is still running after you have exited it, check whether any work needs saving before ending the remaining Chrome tasks.
Once Chrome has closed, restart your computer through Start > Power > Restart.
After Windows loads again, open Chrome and check Task Manager. You may still see multiple processes, which is expected. However, if Chrome previously had stuck processes, restarting may resolve the abnormal behavior.
Step 2: Check Chrome Processes in Task Manager
Before trying advanced fixes, identify how much CPU, memory, and disk activity Chrome is using. This helps you determine whether the number of processes is actually causing a performance problem.
Press Ctrl + Shift + Esc to open Task Manager. In Windows 11 and Windows 10, locate Google Chrome under the Processes tab. You may need to expand the application group to see individual entries.
Check the CPU and Memory columns. If Chrome has several processes but uses a reasonable amount of memory and CPU, there may be nothing to fix.
You can also open Chrome’s own Task Manager by pressing Shift + Esc while Chrome is active. This window shows browser components such as tabs, extensions, and GPU-related tasks, along with their resource usage.
If one tab or extension consumes an unusually large amount of memory or CPU, select that entry and click End process. Be aware that ending a tab’s process can cause unsaved work in that tab to be lost.
Navigation: Google Chrome > Shift + Esc > Identify the resource-heavy task > End process.
This approach helps you target the actual source of the problem instead of closing every Chrome process indiscriminately.
Step 3: Disable Unnecessary Chrome Extensions
Extensions are a common reason Chrome uses more memory or continues running background tasks. Each extension can add functionality, but poorly optimized, outdated, or unnecessary extensions may increase resource consumption.
Open Chrome and enter chrome://extensions in the address bar. Press Enter to view your installed extensions.
Review the list and identify extensions you no longer use. Turn off their switches to disable them temporarily. If you know you no longer need an extension, select Remove to uninstall it.
Restart Chrome and check whether its resource usage improves. If the issue disappears, re-enable extensions one at a time to identify which one may be responsible.
Pay particular attention to extensions that manage downloads, modify webpages, block content, or run background tasks. Their resource requirements can vary considerably.
Only install extensions from sources you trust, and review their permissions before enabling them. Disabling unnecessary extensions can reduce resource usage, but it will not eliminate all Chrome processes because the browser still needs separate processes for its core functions.
Step 4: Turn Off Background Apps When Chrome Is Closed
Chrome can continue running certain background tasks after you close its windows. This behavior may allow extensions or applications to finish work, but it can also leave Chrome processes active when you expect the browser to be completely closed.
To change this setting, open Chrome and navigate to Settings > System. Look for the option labeled Continue running background apps when Google Chrome is closed.
If the option is available and you do not need background tasks, turn it off.
Close Chrome and reopen Task Manager to see whether Chrome continues running after you exit the browser.
Keep in mind that this setting may not be available in every Chrome version or managed environment. Disabling it can also prevent some extensions or web applications from completing background activities.
If you depend on a particular extension to provide notifications or perform background work, test its behavior after changing this setting.
Step 5: Update Google Chrome
An outdated Chrome version may contain bugs that affect performance, stability, or process management. Installing the latest available update can help resolve known issues.
Open Chrome and select Settings and more (three dots) > Help > About Google Chrome.
Chrome will automatically check for available updates. If an update is available, allow it to download and install. When prompted, select Relaunch to finish the process.
After Chrome restarts, open Task Manager and check its resource usage again.
If Chrome says it is up to date, move on to the next troubleshooting method. You do not need to download third-party software to update Chrome.
If you use a work or school computer, your organization may control browser updates. In that case, contact your administrator if Chrome cannot install an update or displays a management message.
Step 6: Clear Unnecessary Browsing Data
Cached files and other browsing data can sometimes contribute to browser glitches. Clearing unnecessary data may help if Chrome behaves abnormally, although it will not necessarily reduce the number of processes.
Open Chrome and press Ctrl + Shift + Delete to open the Clear browsing data window.
Choose a time range, such as All time, if you intend to clear older data. Select the categories you want to remove, such as cached images and files. Review the options carefully before continuing.
Clearing cookies and other site data can sign you out of websites, while deleting saved passwords can remove credentials stored in Chrome. You generally do not need to delete passwords to troubleshoot multiple processes.
Click Delete data after reviewing your selections. Restart Chrome and check whether its performance improves.
If the issue remains, continue to the next step instead of repeatedly clearing browsing data.
Step 7: Reset Google Chrome Settings
If multiple processes are accompanied by persistent crashes, unwanted changes, or abnormal browser behavior, resetting Chrome’s settings may help.
Open Chrome and navigate to Settings > Reset settings. Select Restore settings to their original defaults and review the confirmation message.
Click Reset settings to proceed.
This action restores several Chrome settings, including the startup page, search engine, pinned tabs, and extensions. It also disables extensions and clears certain temporary settings. However, it does not normally delete bookmarks, browsing history, or saved passwords.
After the reset, restart Chrome and check Task Manager.
Remember that resetting Chrome is more extensive than disabling a single extension. Try the simpler solutions first, especially if your browser is otherwise working normally.
Step 8: Scan Windows for Unwanted Software
If Chrome launches unfamiliar tabs, displays unexpected advertisements, or repeatedly runs suspicious extensions, unwanted software may be involved. Multiple Chrome processes alone are not evidence of malware, but additional symptoms warrant a security check.
Open Start > Settings > Privacy & security > Windows Security in Windows 11. In Windows 10, open Settings > Update & Security > Windows Security.
Select Virus & threat protection > Quick scan. Allow the scan to finish and follow the recommended actions if threats are detected.
If the problem continues, consider running a more thorough scan and reviewing unfamiliar programs installed on your PC.
You should also revisit chrome://extensions and remove extensions you do not recognize or trust. Avoid downloading unknown cleanup tools that promise to eliminate Chrome processes, because they may introduce additional problems.
Once the scan and any necessary cleanup are complete, restart your computer and check Chrome again.
Step 9: Reinstall Google Chrome
If none of the previous methods work, reinstalling Chrome may help resolve a damaged browser installation. Before proceeding, make sure your important bookmarks and other browser data are backed up or synchronized with your Google Account.
In Windows 11, open Settings > Apps > Installed apps. In Windows 10, go to Settings > Apps > Apps & features.
Find Google Chrome, select it, and choose Uninstall. Follow the on-screen instructions.
Next, download Chrome from Google’s official website and install it again. Avoid third-party download sites.
Depending on your uninstall choices and user-data settings, local browser information may be affected. Back up anything important before removing Chrome, particularly if you do not use Chrome Sync.
After reinstalling, open Chrome and check Task Manager. Multiple processes will probably appear again because Chrome uses a multiprocess architecture. What matters is whether the browser now operates normally without excessive resource consumption.
FAQs
1. Why does Google Chrome show multiple processes in Task Manager?
Chrome uses separate processes for tabs, extensions, and browser components to improve stability, security, and responsiveness. This is normal behavior and does not necessarily indicate a problem.
2. Can I stop Chrome from opening multiple processes?
You generally cannot eliminate all separate Chrome processes through normal settings. You can reduce unnecessary resource usage by closing unused tabs, disabling extensions, and turning off background apps when Chrome is closed.
3. Why does Chrome keep running after I close it?
Chrome may continue running background applications or extensions. Open Settings > System and disable Continue running background apps when Google Chrome is closed, if that option is available.
4. Do multiple Chrome processes slow down Windows?
Not necessarily. Multiple processes use memory and other system resources, but separating browser components can improve stability. Performance problems are more likely when resource consumption becomes excessive or a particular tab or extension stops responding.
5. Is it safe to end all Chrome processes in Task Manager?
You can end Chrome tasks if the browser is unresponsive, but unsaved work may be lost. Close Chrome normally first whenever possible. Ending processes does not permanently prevent Chrome from creating new ones when you reopen it.
6. How can I reduce Chrome’s RAM usage?
Close unnecessary tabs, disable resource-heavy extensions, update Chrome, and review its Task Manager using Shift + Esc. You can also check whether your version of Chrome offers Memory Saver under Settings > Performance and enable it if appropriate.
Final Words
Seeing multiple Google Chrome processes in Windows 11 or Windows 10 is usually normal, so you do not need to remove every entry from Task Manager. However, if Chrome uses excessive memory, consumes high CPU resources, or continues running unexpectedly after you close it, the troubleshooting methods in this guide can help.
Start by checking Chrome’s Task Manager, disabling unnecessary extensions, and turning off background applications.
If the problem continues, update Chrome, clear unnecessary browsing data, reset its settings, or reinstall the browser as a last resort.