
Seeing 100% disk usage in Windows 11 or Windows 10 can make your computer feel almost unusable. Apps may take forever to open, File Explorer can freeze, and even simple tasks such as switching between windows can become frustratingly slow.
The good news is that 100% disk usage does not necessarily mean your hard drive is failing. Windows services, startup programs, background processes, insufficient memory, outdated drivers, corrupted system files, or storage problems can all contribute to the issue.
This guide walks you through practical fixes in a beginner-friendly order. Start with the easier solutions first, then move toward more advanced troubleshooting if the problem continues.
100% of Disk Usage on Windows 11/10 [Complete Fix]
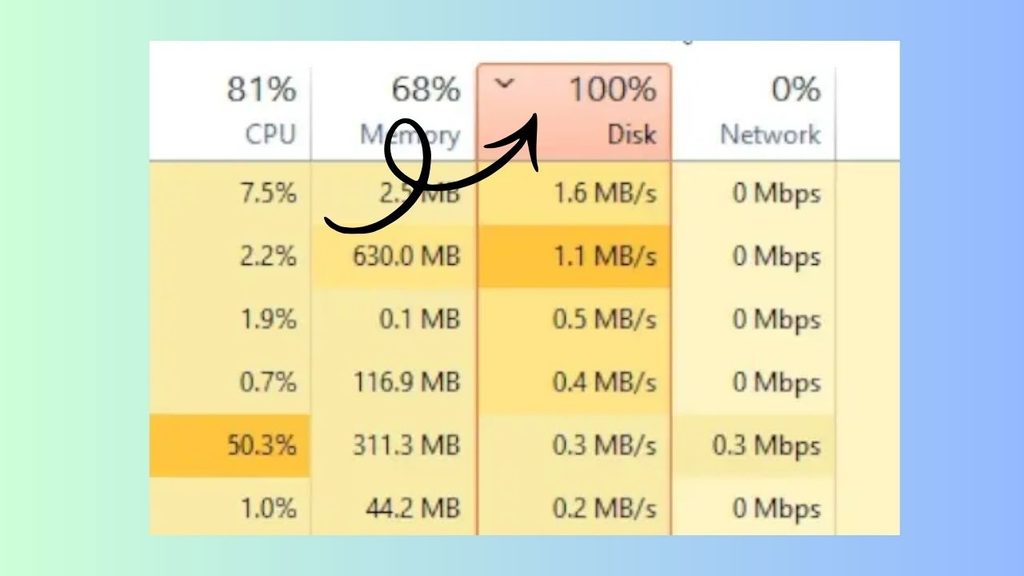
To fix 100% disk usage on Windows 11/10, you can:
- Restart your computer and check whether disk usage returns to normal.
- Identify the process using the disk through Task Manager.
- Disable unnecessary startup apps that constantly access your drive.
- Stop or adjust Windows Search and SysMain if either service is causing excessive disk activity.
- Run a malware scan to rule out unwanted background activity.
- Update Windows and storage-related drivers.
- Repair corrupted Windows system files using SFC and DISM.
- Check your drive for file-system errors.
- Free up storage space and remove unnecessary temporary files.
- Check the health of the storage drive if high disk usage continues.
Before changing anything, open Task Manager by pressing Ctrl + Shift + Esc. Select Processes, then look at the Disk column. If it shows 100%, check which application or service is at the top.
Keep in mind that 100% disk usage means the drive is fully occupied with read or write activity, not that the drive has reached 100% of its storage capacity. A drive with plenty of free space can still report 100% active time.
If one particular application is responsible, deal with that application first. If System, Service Host, Windows Search, or another Windows process is responsible, continue with the steps below.
Step 1: Restart Windows and Check Disk Usage Again
Start with the simplest fix. Save your work, close your applications, and select Start > Power > Restart. A restart clears temporary processes and can stop a background task that has become stuck.
After Windows starts again, wait a few minutes before opening several applications. Press Ctrl + Shift + Esc to open Task Manager and check the Disk column. If disk usage has dropped substantially and remains low, the problem may have been caused by a temporary process.
If the disk immediately climbs back to 100%, continue with the next steps instead of repeatedly restarting the computer.
Step 2: Find the Program Causing 100% Disk Usage
Task Manager can usually tell you what is keeping the drive busy. Press Ctrl + Shift + Esc, select Processes, and click the Disk column to sort processes by disk activity.
Look for applications consuming unusually high disk resources. A browser with many tabs, a game launcher, cloud-storage software, antivirus software, or another large application can sometimes generate substantial disk activity.
If you recognize the application and do not currently need it, right-click it and choose End task. Do not end an unfamiliar Windows process simply because it appears near the top. Some Windows processes are essential, and stopping them can cause additional problems.
If the same application repeatedly causes the issue, check whether it has an available update or setting that controls background activity.
Step 3: Disable Unnecessary Startup Apps
Programs that automatically start with Windows can continue running in the background and access your storage drive.
Open Task Manager > Startup apps. Review the programs listed there and check the Startup impact column. If you see an application you do not need immediately after signing in, select it and choose Disable.
Disabling a startup application does not uninstall it. It simply prevents that program from launching automatically when Windows starts. You can still open it manually whenever you need it.
Avoid disabling security software, hardware utilities, or other programs you know are necessary for your computer.
Step 4: Temporarily Stop Windows Search
Windows Search indexes files so that searches can return results quickly. On some systems, search indexing can create heavy disk activity.
Press Windows + R, type services.msc, and press Enter. Find Windows Search in the Services window. Double-click it and select Stop.
Now check Task Manager again. If disk usage drops noticeably, Windows Search may be contributing to the problem.
For a temporary test, stopping the service is enough. If the problem returns whenever indexing runs, you can reduce the locations Windows indexes through Settings > Privacy & security > Searching Windows.
Step 5: Test the SysMain Service
SysMain, previously known as Superfetch, is designed to improve application loading by managing frequently accessed data. However, it can sometimes contribute to excessive disk activity, particularly on certain systems.
Press Windows + R, enter services.msc, and press Enter. Locate SysMain, right-click it, and select Stop.
Open Task Manager and watch the disk percentage for a few minutes. If the usage drops and stays lower, SysMain may have been contributing to the problem.
Do not assume this service is always responsible. If stopping it makes no meaningful difference, leave your troubleshooting focused elsewhere.
Step 6: Scan Windows for Malware
Malware can run background processes that continuously read from or write to your drive. That activity can contribute to unusually high disk usage.
Open Windows Security through Start > Settings > Privacy & security > Windows Security > Virus & threat protection. Select Scan options, choose Full scan, and start the scan.
A full scan can take some time, especially if your computer contains many files. Let it finish before deciding whether malware is involved.
If Windows Security detects a threat, follow its recommended removal or quarantine action and restart your computer afterward.
Step 7: Install Windows Updates and Driver Updates
Outdated Windows components or storage drivers can sometimes contribute to performance problems.
Open Settings > Windows Update and select Check for updates. Install available updates and restart the computer when Windows asks you to.
You should also check for available updates for your storage controller, chipset, SATA, NVMe, or motherboard drivers through your computer manufacturer’s support software or official support page.
Avoid downloading random drivers from third-party websites. Use the manufacturer’s official support resources whenever possible.
Step 8: Repair Corrupted Windows System Files
Damaged Windows system files can cause unusual system behavior, including performance problems.
Right-click Start and select Terminal (Admin) or Command Prompt (Admin), depending on your Windows configuration. Run:
DISM /Online /Cleanup-Image /RestoreHealth
Wait for the process to finish. It may take several minutes.
Then run:
sfc /scannow
Allow the scan to reach 100%. If Windows reports that it repaired corrupted files, restart your computer and check disk usage again.
These commands are particularly useful when the problem is related to damaged Windows components rather than a specific application.
Step 9: Check the Drive for Errors
File-system errors can also cause excessive disk activity.
Open Terminal (Admin) and run:
chkdsk C: /scan
Replace C: if Windows is installed on another drive.
The /scan option checks the file system for problems while Windows is running. If errors are found, Windows may recommend additional repair steps.
Do not interrupt a lengthy disk-checking operation unless Windows specifically gives you an option to cancel it safely.
Step 10: Free Up Storage Space
A drive that is nearly full can make Windows less responsive, particularly when it needs temporary space for updates, applications, and system operations.
Go to Settings > System > Storage. Review categories such as Temporary files, Installed apps, Documents, and other storage areas.
Remove files you no longer need and empty the Recycle Bin after checking its contents. You can also use Storage Sense to automatically manage temporary files.
Try to maintain a reasonable amount of free space on your Windows drive rather than allowing it to remain almost completely full.
Check Whether Virtual Memory Is Configured Correctly
Windows uses a paging file on the storage drive when it needs additional virtual memory. Incorrectly configured virtual memory can contribute to performance problems.
Open Settings > System > About > Advanced system settings. Under Performance, select Settings, open the Advanced tab, and select Change under Virtual memory.
For most users, allowing Windows to automatically manage the paging file size is the safest option. If you previously entered a custom paging-file size, consider returning it to automatic management and restarting Windows.
This is especially worth checking if your computer has limited RAM and experiences heavy disk activity while several applications are open.
Check the Health of Your Storage Drive
If disk usage remains at 100%, especially when the computer is slow, freezing, crashing, or producing unusual noises, consider the possibility of a storage-drive problem.
For an HDD, clicking, grinding, or repeated mechanical noises are serious warning signs. For an SSD, sudden performance problems, disappearing files, read/write errors, or other storage-related warnings can indicate a problem.
Before performing extensive troubleshooting on a potentially failing drive, back up important files to another drive or a trusted cloud-storage service.
If the drive is failing, software changes will not permanently solve the underlying hardware problem. Replacing the drive may be necessary.
Faqs
Why is my disk usage at 100% even when I am not doing anything?
Windows can perform background tasks such as indexing, updates, antivirus scans, synchronization, maintenance, or virtual-memory operations even when you are not actively using an application. Task Manager can help identify which process is responsible.
Does 100% disk usage mean my hard drive is full?
No. Disk usage percentage in Task Manager refers to active disk time, not the amount of storage space being used. A drive with hundreds of gigabytes of free space can still show 100% active time.
Can low RAM cause 100% disk usage?
Yes. When available RAM is low, Windows may rely more heavily on the paging file, which is stored on the disk. This can increase disk activity, particularly when several memory-intensive applications are open.
Should I disable SysMain permanently?
Not necessarily. SysMain is designed to improve system responsiveness in many situations. If stopping it does not resolve the problem, there is little reason to disable it.
Can an SSD fix 100% disk usage?
An SSD can dramatically improve storage performance, but it does not automatically eliminate 100% disk activity. Windows can still report 100% active time if another process is continuously accessing the drive.
What should I do if none of these fixes work?
If the problem persists, check Task Manager for the process responsible and examine your drive’s health. If Windows itself appears to be damaged, you can consider more advanced recovery options after creating a backup.